
With the power of cloud and modern technologies, launching and running a personal wordpress website has become a piece of cake. A perfect example is running WordPress Bitnami stack on Amazon Web Services Lightsail service. But painfully it also means that these new advanced tools and technologies have open up a lot new avenues for the bad guys to try and hack our websites. A recent study shows that over 70% of all attacks are now carried out over the web application level.
One of the easiest way to protect our websites from hackers and web vulnerabilities is to setup a Web Application Firewall, also known as WAF in short. There are many commercial products & services available in the market which are really effective to protect websites, for example AWS WAF, Cloudflare WAF etc. However almost 99.9% of them are fully paid services or at most have free limited trial period.
So for one of my personal WordPress website I wanted to setup WAF solution, but with following considerations:
- It should be a Reputed, Reliable and Trusted Service
- Easy to Setup
- Free of Cost
I am using AWS Lightsail server and WordPress Bitnami stack with Apache as the default web server. After spending a considerable amount of time, I realised that ModSecurity module is the ultimate WAF solution that I was looking for.
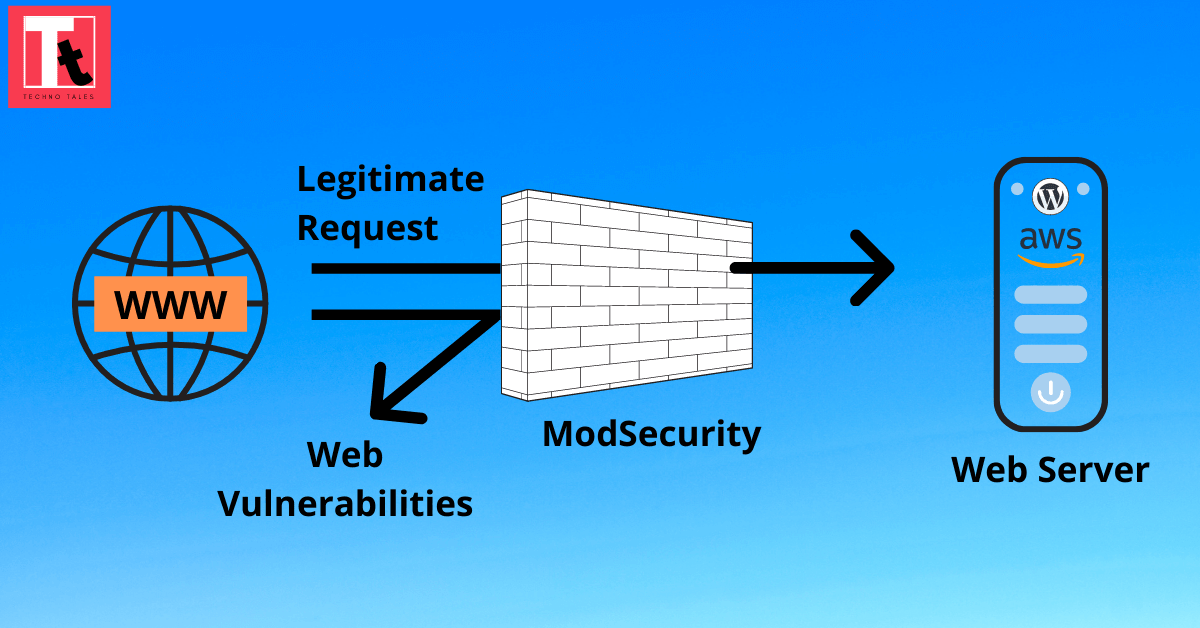
ModSecurity is an open source, cross platform web application firewall (WAF) engine for Apache, IIS and Nginx that is developed by Trustwave’s SpiderLabs. This module is quite popular and effective to protect the websites from various web vulnerabilities. It can help detect and prevent many attacks against your web application by checking all HTTP(s) requests you are willing to allow or block (e.g., request methods, request headers, content types, etc.) against its set of rules. If the check fails, the visitor will not see the content of your website, predefined actions are performed, usually the visitor will get 403 Forbidden screen. Most importantly, it is an open source web application firewall, so completely free to use.
In this article I will explain how I setup the Apache ModSecurity module on my server.
Few Important Points To Note:
- AWS Lightsail server comes with Bitnami WordPress stack image pre-installed, which is a “Self-Contained” Bitnami installation.
- To understand the default Apache configuration on Bitnami, please read this short Bitnami Documentation page first.
- The default main Apache configuration file on my server is: /opt/bitnami/apache2/conf/httpd.conf.
- The overall concept and setup guidelines for ModSecurity are generic. So you can follow this article for other Linux OS distributions as well.
Steps To Install/Enable Apache ModSecurity Module:
STEP-1: Connect to the WordPress instance using browser based SSH feature from AWS Lightsail console. Check if ModSecurity Apache module is already installed, by running the below command with ‘bitnami‘ user:
grep mod_security /opt/bitnami/apache2/conf/httpd.confSTEP-2: If the output of the above command does not return any value, then continue following this step. Otherwise jump to Step-3.
To install the module on a Linux Debian System, run the below command as ‘bitnami‘ user:
sudo apt install libapache2-modsecurityAfter installing the module, restart apache web server by running the below script with ‘bitnami‘ user:
sudo /opt/bitnami/ctlscript.sh restart apacheSTEP-3: In some of the Bitnami installation the Apache ModSecurity module is already pre-installed, but disabled by default. If the module is ALREADY INSTALLED, then running the grep command as mentioned above in Step-1 will give either ONE of the below output:
If Apache ModSecurity is Installed, but Disabled(contains a character # at the beginning of the line):

To enable the module, edit httpd.conf file and remove character # from the beginning of the line and save the file. Then restart apache service as described in Step-2.
If Apache ModSecurity is Installed and Enabled:

Apart from ModSecurity module, we have to enable another Apache module in httpd.conf file called “mod_unique_id.so“. More details on this module can be found here.

STEP-4: After the ModSecurity module is correctly installed and setup, search for the modsecurity main configuration file “modsecurity.conf“. In my case it was located at:
/opt/bitnami/apache2/conf/modsecurity.confYou can also use the below command to find location of modsecurity main configuration file:
find /opt/bitnami/ -type f -name modsecurity.conf 2>/dev/nullNow add the below lines at the END of httpd.conf file. This will load ModSecurity module when Apache service starts up:
# Enable ModSecuirty2 Module
Include "/opt/bitnami/apache2/conf/modsecurity.conf"STEP-5: Restart Apache web server to load the ModSecurity module.
sudo /opt/bitnami/ctlscript.sh restart apacheSTEP-6: Check the Apache web server log to confirm if ModSecurity module has been successfully loaded. Use the below command to check the log entries specific to ModSecurity mdule:
sudo cat /opt/bitnami/apache2/logs/error_log | grep -i ModSecurityIf the module is successfully loaded without any error, then the output of the above command will be something similar to below:

Recommended ModSecurity Config Settings:
Check the ModSecurity config file “modsecurity.conf” to explore the different options available. Depending on use cases and requirement, you can adjust these settings. In my case I made changes to the below parameters.
- SecRuleEngine – This is the Modecurity Master Switch. The default value is DetectionOnly which only reports the findings in logs, but do not actually block any request. I set it to On. To disable modsecurity service, set the value to Off.
- SecStatusEngine – The default value is On. With the default value, the parameter helps the modsecurity module developers to collect some basic information like ModSecurity version, Web Server version, APR version, PCRE version, Lua version, Libxml2 version, Anonymous unique id for host etc. I set this value to Off.
- SecDataDir – The location where ModSecurity will keep its persistent data. The default value is /tmp. I set it to /opt/bitnami/apache2/mods-enabled/modsecurity/data.
If you change the SecDataDir parameter value, then make sure that Apache service has “read” and “write” access to this directory. In my case, the apache service runs with ‘daemon‘ system user. So I explicitly assigned read-write access to ‘daemon’ user on the directory.
After making the changes in modsecurity.conf file, restart Apache service to reload the config.
sudo /opt/bitnami/ctlscript.sh restart apacheFinal Words
Apache ModSecurity is a very useful and effective module to safeguard the websites from malicious web attacks, if configured properly. However it is NOT the best solution in the market when it comes to Enterprise Web Security or if you are managing a web application that details with sensitive data.
The main reason is ModSecurity is an Apache module that runs on the Web Server. So when a lot of traffic comes in, modsecurity has to do the heavy lifting of filtering the traffic using the operating system resources on which the web server itself is running. If the web server is already overloaded in processing other requests, then the server might crash if ModSecurity request for additional resources.
But still ModSecurity is very handy and effective solution for small and medium websites because it has a well tested and proven background. Also being an open source software, it is completely FREE to use. And if you spend some time to integrate OWASP CRS with ModSecurity, as explained in my other article, then you can make the life of hackers a real nightmare.