
In my previous article, I explained the importance of ModSecurity module & how to set it up on a WordPress server running on AWS Lightsail. There us absolutely no doubt that ModSecurity acts as the initial line of defence to protect your website from various malicious web attacks. But ModSecurity alone is not enough to protect your website. You need to configure an additional rule set to make web protection more robust and efficient. The OWASP ModSecurity Core Rule Set (CRS) is a set of generic attack detection rules for use with ModSecurity.
You can also watch the video tutorial on my YouTube channel here.
What Is OWASP ModSecurity Core Rule Set (CRS)?
The OWASP ModSecurity Core Rule Set (CRS) is a set of firewall rules, which can be loaded into ModSecurity or compatible web application firewalls. The CRS consists of various “.conf” files, each containing generic signatures for a common attack category, such as SQL Injection (SQLi), Cross Site Scripting (XSS), etc. It uses string matching, regular expression checks, and the libinjection SQLi/XSS parser.
What Is The Difference Between ModSecurity and CRS?
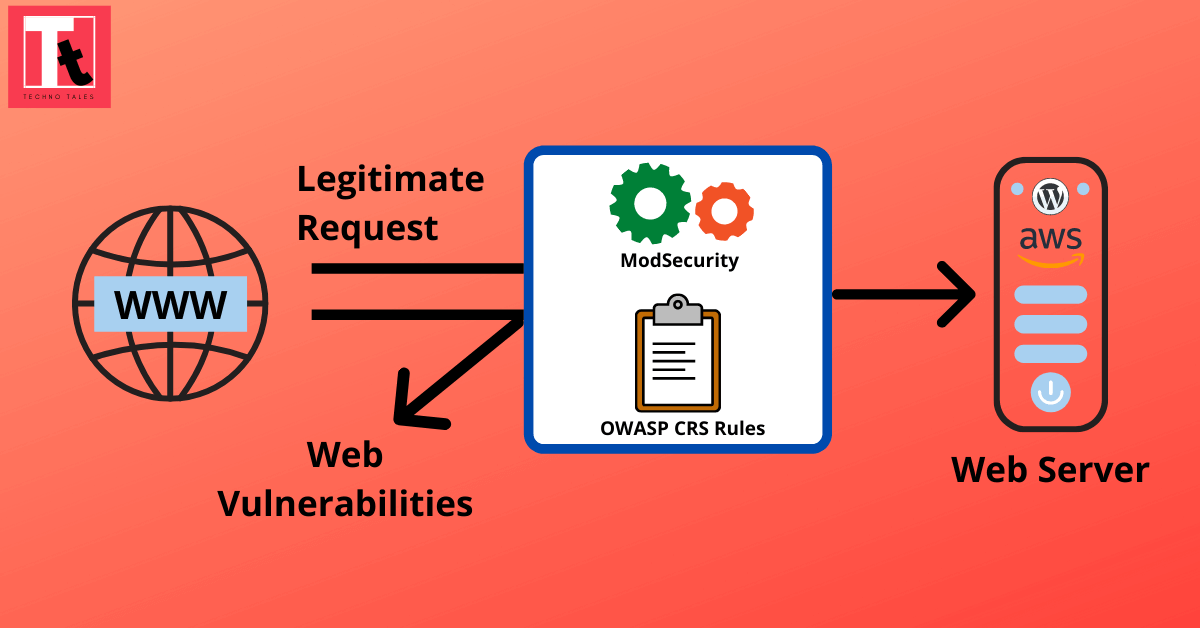
ModSecurity is a firewall engine which can inspect traffic on your web server. It can log and block requests. However, an engine does nothing without a certain policy. The CRS delivers a policy where requests to your web applications are inspected for various attacks, and malicious traffic is blocked.
In this article I will explain how I setup the OWASP CRS on my WordPress(Bitnami) Debian server running on Amazon Web Service Lightsail.
Few Important Points To Note:
- Before proceeding further, please install & setup ModSecurity following my article: How To Setup A Free Web Application Firewall On AWS Lightsail WordPress Server.
- I already created some of the directory structures while setting up ModSecurity. So again – I highly recommend to checkout my previous article first before proceeding further.
- The overall concept and setup guidelines for OWASP CSR are generic. So this article can be followed on other Linux OS distributions as well.
- Most of the linux commands should be run with “bitnami” user, unless stated otherwise.
How To Setup OWASP CRS On AWS Lightsail Server
STEP-1: Check if the following directory structure already exist. If not, then create the directory structure with “bitnami” user to store the ModSecurity and CSR related configuration and data files:
sudo mkdir -p /opt/bitnami/apache2/mods-enabled/modsecurity/dataSTEP-2: Download the latest CRS package from Github. The old repository was maintained by Trustwave SpiderLabs. The new Github repository can be found here. Make sure you clone the new repo, as the old repo is no longer actively maintained.
cd /tmp
git clone https://github.com/coreruleset/coreruleset.gitSTEP-3: Go inside the newly cloned repository and copy the CRS Rules and Config files to the “modsecurity” directory that we created in STEP-1.
cd coreruleset
mv crs-setup.conf.example /opt/bitnami/apache2/mods-enabled/modsecurity/crs-setup.conf
mv rules/ /opt/bitnami/apache2/mods-enabled/modsecurity/STEP-4: Set necessary permission on the files and directories copied above. Make sure “bitnami” has atleast “read” and “write” permission on the files and directories copied in STEP-3. Similarly the “root” user should have at least “read” permission.

STEP-5: Update the Apache main configuration file “httpd.conf” and add the below entries at the end of the file:
<IfModule security2_module>
        IncludeOptional /opt/bitnami/apache2/mods-enabled/modsecurity/*.conf
        Include /opt/bitnami/apache2/mods-enabled/modsecurity/rules/*.conf
</IfModule>
The configuration file should match the path as defined in the IncludeOptional directive. Add another Include directive pointing to the rule set.
STEP-6: Restart Apache service to reload the configuration of OWASP CRS.
sudo /opt/bitnami/ctlscript.sh restart apacheCongratulations! You have now successfully enabled the OWASP CRS ruleset for ModSecurity.
But wait! The task is not over yet.
The OWASP CRS package comes with a lot of default rules which needs to be enabled depending on the website or web application requirement. This is the place where some expertise is required. Simply enabling all the rules will not work as there will be high chances that it will block most of the legitimate traffic to your website. In the below section, I will discuss some of the rules from OWASP CRS to guide you in this journey :-).
Walkthrough OWASP CRS Configuration Setup File
If you followed all my steps that I explained above, then your OWASP CRS config file should be:
/opt/bitnami/apache2/mods-enabled/modsecurity/crs-setup.confIf you open the file and start exploring, you will see that all the rules are very self-explanatory. However there are FEW parameters worth mentioning:
Paranoia Level – The Paranoia Level (PL) setting allows you to choose the desired level of rule check to protect your web application. Higher paranoia levels will strengthen web security, but will also increase the possibility of blocking some legitimate traffic due to false alarms (also named false positives or FPs). Recommended level for most use cases is 1 (default) or 2. Enable the below rule in crs-setup.conf file to set Paranoia level to 1.
SecAction \
"id:900000,\
phase:1,\
nolog,\
pass,\
t:none,\
setvar:tx.paranoia_level=1"
Anomaly Threshold – ModSecurity assigns a score for each security risk found in a request (Critical: 5, Error: 4, Warning: 3, Notice: 2). Anomaly threshold determines the accumulated score for a request to be blocked. Recommended level for production website is 5-10. To use this parameter, I enabled the below rule:
SecAction \
"id:900100,\
phase:1,\
nolog,\
pass,\
t:none,\
setvar:tx.critical_anomaly_score=5,\
setvar:tx.error_anomaly_score=4,\
setvar:tx.warning_anomaly_score=3,\
setvar:tx.notice_anomaly_score=2"
Application Specific Rule Exclusions – OWASP CRS provides common rule exclusions for some popular Content Management System (CMS), including WordPress, Drupal, NextCloud etc. If your current web application uses any of those CMS, then select it to reduce false positives and it will be automatically applied to your firewall. In my case I enabled it for WordPress:
SecAction \
"id:900130,\
phase:1,\
nolog,\
pass,\
t:none,\
setvar:tx.crs_exclusions_wordpress=1"
HTTP Policy Settings: This section defines different policies the HTTP protocol. For example the below rule allows only HTTP Get, Head, Post & Options method.
SecAction \
"id:900200,\
phase:1,\
nolog,\
pass,\
t:none,\
setvar:'tx.allowed_methods=GET HEAD POST OPTIONS'"
To allow only HTTP versions from 1.0 onwards, enable the below rule:
SecAction \
"id:900230,\
phase:1,\
nolog,\
pass,\
t:none,\
setvar:'tx.allowed_http_versions=HTTP/1.0 HTTP/1.1 HTTP/2 HTTP/2.0'"
DoS Protection: When a client is making more than 100 requests (excluding static files) within 60 seconds, this is considered a ‘burst’. After two bursts, the client is blocked for 600 seconds. To setup this feature, enable the below rule:
SecAction \
"id:900700,\
phase:1,\
nolog,\
pass,\
t:none,\
setvar:'tx.dos_burst_time_slice=60',\
setvar:'tx.dos_counter_threshold=100',\
setvar:'tx.dos_block_timeout=600'"
You can always play with the variables “dos_burst_time_slice“, “dos_counter_threshold” and “dos_block_timeout” to suit your needs.
Testing The Rules
In Bitnami stack, the file /opt/bitnami/apache2/conf/bitnami/bitnami.conf defines which configuration for each application should be loaded by the Apache server. To test the newly configured OWASP CRS rule, add the below configuration under “virtual host” container by editing “bitnami.conf” file:
SecRuleEngine On
SecRule ARGS:testparam "@contains test" "id:1234,deny,status:403,msg:'Our test rule has triggered'"
Now restart Apache service to reload the new config & run the below curl command on AWS Lightsail server:
curl localhost/index.html?testparam=testNow if you check the Apache error log, you will see that the curl request has been blocked by Apache web server with HTTP response code 403 and our configured error message “Our test rule has triggered” has been printed in the log.
Final Words
ModSecurity and OWASP CRS helps protect your website from many types of attacks against your web application. Above mentioned rules are just the tip of iceberg. The possibility to fine tune and further enhance your web security is endless. But to achieve that you should spend a considerable amount of time to go through ModSecurity and OWASP CRS documentation.
To be honest, web security is a subjective matter. There is NO “one-setting-fits-all” type of configuration available. At the end it all depends on the type of website and the sensitivity of the data that you are handling.